Back Pain | Shoulder Pain | Knee Pain | Upper-Body Workout | Lower-Body Workout
In recent years, the shoulder has begun to rival the lower back as the top pain point for active people. Why? Partly due to how the shoulder is constructed, but plenty more is just about us—how we train, how we take care of ourselves, and how we position our bodies in the modern world.
I’ll be blunt: We, the lifters and athletes, aren’t doing ourselves any favors in the way we warm up, train, and care for the shoulder. That’s why the first step is to alert you to what you’re doing that might not be helping your situation. Then we’ll learn some pain-free alternatives to popular lifts and see how to put it all into action in your training.
This is the guide you need to get back to pain-free pushing, pulling, and living again!
Step 1: Stop Making Things Worse
More than any other pain point, the shoulder is a place where people’s attempts to solve the problem often make it worse. Here are a few examples:
Chasing shoulder mobility: Mobility definitely isn’t a cure-all for shoulder pain. In fact, you almost definitely need more stability than mobility. And unfortunately, ”stretching” your shoulder isn’t the answer, either. Pulling on that shoulder capsule through intense stretches can make an injury worse!
Skipping push-ups: As lifters get stronger at weighted movements, they tend to ignore push-ups. This is a mistake! Unlike most other pushing movements, the push-up actually encourages proper shoulder function. If you’re chasing big bench numbers but you can’t rock out a set of 10-15 perfect push-ups, you’re setting yourself up for problems.
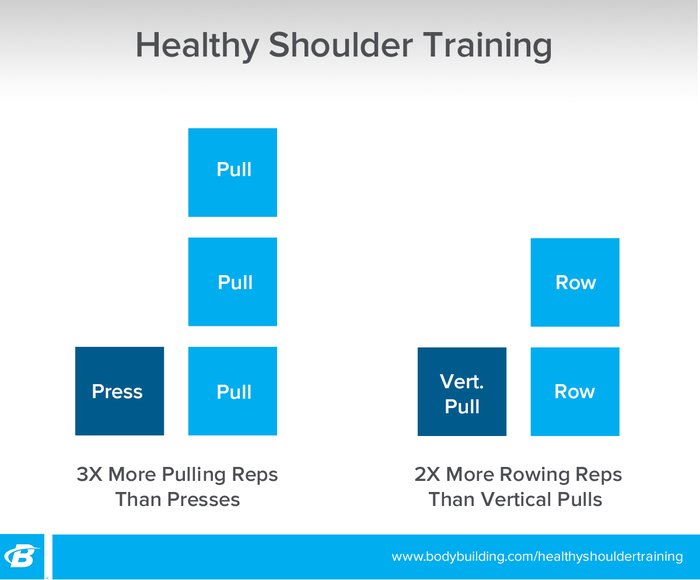
Pushing more than pulling: Both because of our modern postural trends and because of the way the shoulder is built, you need to pull at least twice—and more like three times—as much as you push. Seriously! You can find more detail about how to rectify this situation in the article ”Safe, Strong Upper-Body Lifting Begins With These Two Ratios.“ The short version: Use your warm-up!

Training only on machines. Building a strong, capable shoulder demands sometimes working outside of machines, with tools like free weights and resistance bands. Bands in particular should be a permanent addition to your gym bag.
Training in stretched positions: In your training, look out for exercises that put you in a powerful stretch while you’re moving fast. A couple of classic examples include kipping pull-ups and muscle-ups. These are going to be problematic for an injured shoulder. Some people never have problems with them, but plenty do.
Lifting overhead when fatigued: This is a real problem in boot camp and CrossFit-style workouts, but bodybuilders and other athletes can be just as guilty. Any activity that demands lots of overhead strength or stability when you’re already feeling worked is going to put your shoulder at risk. Respect your limits, and train with people who respect them, too.
Step 2: Make Intelligent Movement Substitutions
The biggest mistake of all? Trying to keep lifting through movements that cause you pain, rather than looking for alternatives.
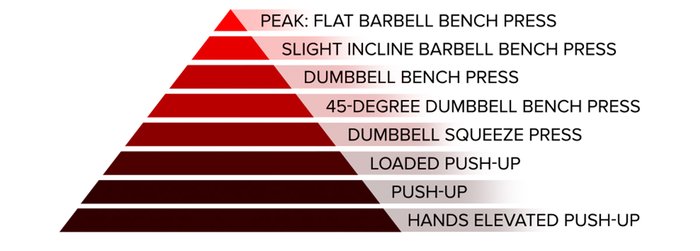
These movement pyramids show complete progressions of the most common shoulder-aggravating exercises. The bottom movement is the most approachable and the top is the most technical or difficult—like the barbell military press. Your objective is to determine the most advanced variation you can perform without pain. Then, use that variation in your training.
If you’re following a program that has heavy benching in it and you know it will cause you pain, here’s what to do: pick something below it on the pyramid. A personal favorite that’s gaining popularity is the banded push-up. Or you could do landmine presses instead of military presses.
Horizontal Push

Vertical Press

Vertical Pull

Row/Horizontal Pull

This is crucial: Don’t feel like you have to aim for the top of the pyramid! Focus on doing what you can well and getting stronger at it. You can do great on landmine presses and push-ups for a long time.
For more in-depth training guidance on how to use these pyramids, and to see video demonstrations of each movement, check out the full Unstoppable: The Ultimate Guide to Training Through Injury in BodyFit.
Step 3: Get Back to Training
Want to see what training through shoulder pain looks like in action? Check out the Unstoppable Shoulder-Friendly Upper-Body Workout. It’s got everything your favorite hardcore chest, shoulder, or back workout has, but with none of the regret you might usually feel a day or two later.
If you’re creating your own workouts, here are three big principles to guide you:
1. Treat no movement as mandatory. You can build a great chest without benching and great shoulders without heavy presses. Be your own advocate and use pain-free variations, no matter what your written program says.
2. Prioritize the upper back. Put tons of volume into your upper back, using all the tools at your disposal: bands, dumbbells, cables—you name it. The best way to do it is with your warm-up. This three-move circuit gets 90 reps into the ”pull” column, and blood into your shoulders, like almost nothing else:
3. Embrace raises and isolation training. Light isolation work, like dumbbell lateral raises, can do wonderful things for cranky shoulders. Even if you’re not a bodybuilder, consider finishing off your workout by getting a pump with a light weight—maybe as light as 5 pounds!
Yes, You Can Lift Pain Free
Shoulder pain is not a mandatory part of the athletic life. In actuality, you have more control over the situation than you might realize. It’s time to use it!
Want to get proactive about ridding your life of pain? Use these other tools in the Unstoppable series:
Want to stay in the game? Take care of your joints both inside and outside of the gym.
